Getting Started with Nomad

Introduction
Most of us would think that Nomad is just another alternative container orchestrator to Kubernetes (this was my initial thought as well) but it actually does more than that. Nomad is a scheduler and orchestrator that deploys and manages containers and non-containerised applications across on-prem and clouds.
In this post, I will be going through some of the key concepts of Nomad, deploy it from scratch on 6 VMs (3 servers, 3 clients), and run an example containerised application.
Key Concepts
Before diving into the setup, let's understand the core concepts that make Nomad powerful and flexible.
Architecture Components
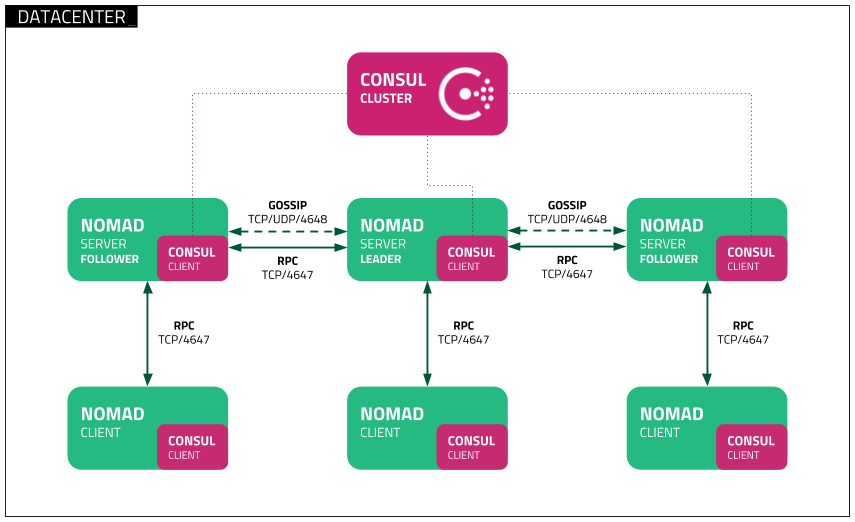 Fig 1. Nomad Cluster Architecture with Consul
Servers
Servers are the brain of the cluster. They manage the clients, scheduling of workloads, and handle API requests. There are typically 3 or more servers for high availability in a production environment.
Clients (Agents)
Clients are the workhorses that run the applications. They register with servers, report their capacity, and execute the tasks assigned to them.
Jobs
Jobs are the declarative specifications of what you want to run on the clients. They contain a set of tasks and define the desired state of the applications.
Task Drivers
Task drivers enable Nomad clients to execute both containerised and non-containerised applications. The flexibility allows Nomad to support diverse workloads while providing proper resource isolation.
This is the list of task drivers that are bundled together with the Nomad binary. Additionally, there are other plugins that can be installed as needed.
| Bundled with Nomad binary | Plugin |
|---|---|
| Docker | Exec2 |
| Isolated Fork/Exec | Podman |
| Java | Virt |
| QEMU | |
| Raw Fork/Exec |
Schedulers
Nomad provides several schedulers that determine how and where your applications run:
| Type | Purpose | Behavior | Example |
|---|---|---|---|
| Service | Long lived applications that should always be available | Restarts failed tasks, maintains desired count depending on job's restart and reschedule blocks | Web applications, Redis cache, PostgreSQL database |
| Batch | Short lived tasks that run to completion | Runs once and exits, doesn't restart on completion unless exits with error (handled according to the job's restart and reschedule blocks) | ETL jobs, backups, analytics, data migration scripts |
| System | Task that must run on all clients that meet the job's constraints | Invoked when clients join the cluster or transition into ready state | Prometheus node exporter, Filebeat log shipper |
| System Batch | One time task that must run on all clients that meet the job's constraint | Runs once on each node, then completes | OS update, certificate installation |
Here's how to specify the scheduler type in a job definition:
# redis.nomad.hcl
job "redis-cache" {
  type = "service"

  group "redis-group" {
    count = 1
    network {
      port "redis" {
        to = 6379
      }
    }
  }
  ...
}
Resource Management
Nomad uses a bin-packing algorithm to efficiently place tasks on clients based on available resources (CPU, memory, disk). It also considers the following:
- Hard constraints: Requirements that must be met (specific OS, hardware)
- Soft constraints: Preferences that are nice to have (spread across availability zones)
- Resource requirements: CPU, memory, disk, and network needs
Integrations
Nomad integrates seamlessly with Consul for service discovery and Vault for secrets management, forming the complete HashiCorp stack for infrastructure automation.
Prerequisites & Requirements
Do note that for a production environment, you should spin up instances with the following resources as stated here: - CPU: 4-8+ cores - Memory: 16-32+ GB - Storage: 40-80+ GB fast disk - Network: High Bandwidth
Lab Setup
We will only be spinning up Nomad in this post. There won't be any Consul or Vault integration involved.
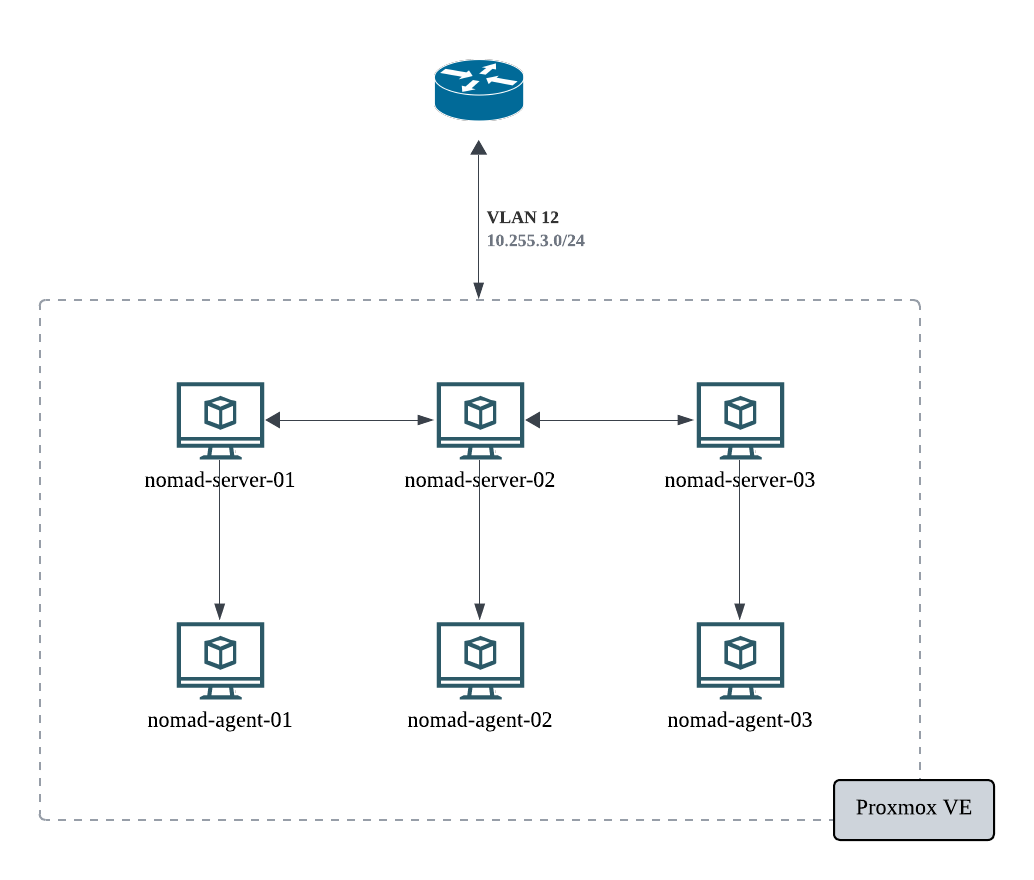 Fig 2. Lab Setup Architecture with Proxmox
As this is for testing purposes only, I have created 6 VMs on Proxmox (which I have for my homelab) for 3 servers and 3 clients. The same setup can be done on any cloud providers (AWS, GCP, Azure).
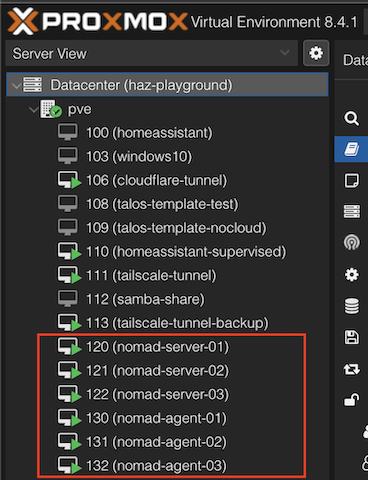 Fig 3. Home Lab Proxmox VE Virtual Machines
Take note that these resource allocations are way below the recommended value and is for testing only.
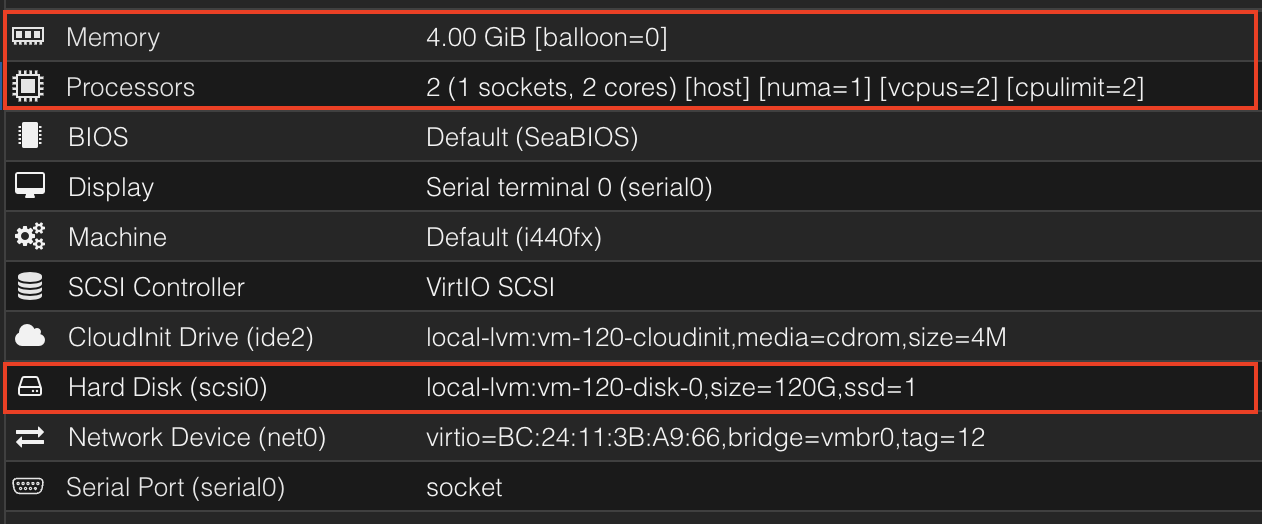 Fig 4. Nomad resource allocation in Proxmox
Installation
Docker Engine
# Add Docker's official GPG key:
sudo apt-get update
sudo apt-get install ca-certificates curl unzip
sudo install -m 0755 -d /etc/apt/keyrings
sudo curl -fsSL https://download.docker.com/linux/ubuntu/gpg -o /etc/apt/keyrings/docker.asc
sudo chmod a+r /etc/apt/keyrings/docker.asc

# Add the repository to Apt sources:
echo \
  "deb [arch=$(dpkg --print-architecture) signed-by=/etc/apt/keyrings/docker.asc] https://download.docker.com/linux/ubuntu \
  $(. /etc/os-release && echo "${UBUNTU_CODENAME:-$VERSION_CODENAME}") stable" | \
  sudo tee /etc/apt/sources.list.d/docker.list > /dev/null
sudo apt-get update
sudo apt-get install docker-ce docker-ce-cli containerd.io docker-buildx-plugin docker-compose-plugin
sudo docker info
# Client: Docker Engine - Community
#  Version:    28.3.2
#  Context:    default
#  Debug Mode: false
#  Plugins:
#   buildx: Docker Buildx (Docker Inc.)
#     Version:  v0.25.0
#     Path:     /usr/libexec/docker/cli-plugins/docker-buildx
#   compose: Docker Compose (Docker Inc.)
#     Version:  v2.38.2
#     Path:     /usr/libexec/docker/cli-plugins/docker-compose

# Server:
#  Containers: 0
#   Running: 0
#   Paused: 0
#   Stopped: 0
#  Images: 0
#  Server Version: 28.3.2
# ...
Nomad
# create unique, non-privileged system user to run Nomad
sudo useradd --system --home /etc/nomad.d --shell /bin/false nomad
sudo usermod -G docker -a nomad

curl --silent --remote-name https://releases.hashicorp.com/nomad/1.10.3/nomad_1.10.3_linux_amd64.zip

unzip nomad_1.10.3_linux_amd64.zip
sudo chown root:root nomad
sudo mv nomad /usr/local/bin/
nomad version

# create data directory for Nomad
sudo mkdir --parents /opt/nomad
sudo chown nomad:nomad /opt/nomad
Configuring systemd
sudo vim /etc/systemd/system/nomad.service
# /etc/systemd/system/nomad.service
[Unit]
Description=Nomad
Documentation=https://www.nomadproject.io/docs/
Wants=network-online.target
After=network-online.target

# When using Nomad with Consul it is not necessary to start Consul first. These
# lines start Consul before Nomad as an optimization to avoid Nomad logging
# that Consul is unavailable at startup.
#Wants=consul.service
#After=consul.service

[Service]

# Nomad server should be run as the nomad user. Nomad clients
# should be run as root
User=nomad
Group=nomad

ExecReload=/bin/kill -HUP $MAINPID
ExecStart=/usr/local/bin/nomad agent -config /etc/nomad.d
KillMode=process
KillSignal=SIGINT
LimitNOFILE=65536
LimitNPROC=infinity
Restart=on-failure
RestartSec=2

## Configure unit start rate limiting. Units which are started more than
## *burst* times within an *interval* time span are not permitted to start any
## more. Use `StartLimitIntervalSec` or `StartLimitInterval` (depending on
## systemd version) to configure the checking interval and `StartLimitBurst`
## to configure how many starts per interval are allowed. The values in the
## commented lines are defaults.

# StartLimitBurst = 5

## StartLimitIntervalSec is used for systemd versions >= 230
# StartLimitIntervalSec = 10s

## StartLimitInterval is used for systemd versions < 230
# StartLimitInterval = 10s

TasksMax=infinity
OOMScoreAdjust=-1000

[Install]
WantedBy=multi-user.target
Common Configuration
sudo mkdir --parents /etc/nomad.d
sudo chown -R nomad:nomad /etc/nomad.d
sudo chmod 700 /etc/nomad.d
sudo vim /etc/nomad.d/nomad.hcl
Add this configuration to the nomad.hcl configuration file
datacenter = "dc1"
data_dir = "/opt/nomad"
Server Configuration
sudo vim /etc/nomad.d/server.hcl
Add this configuration to the server.hcl configuration file:
server {
  enabled = true
  bootstrap_expect = 3 # replace with number of servers deploying
  server_join {
    retry_join = [
      "10.255.3.2", # replace this with the server ip address
      "10.255.3.3", # replace this with the server ip address
      "10.255.3.4", # replace this with the server ip address
    ]
    retry_max = 0
    retry_interval = "15s"
  }
}

acl {
  enabled = true
}
Clients Configuration
sudo mkdir /opt/alloc_mounts
sudo chown nomad:nomad /opt/alloc_mounts
sudo vim /etc/nomad.d/client.hcl
Add the following configuration to the client.hcl configuration file:
client {
  enabled = true
  servers = [
      "10.255.3.2",
      "10.255.3.3",
      "10.255.3.4",
  ] # add the ip address of the servers in this list
}

plugin "raw_exec" {
  config {
    enabled = true
  }
}
Starting Nomad
sudo systemctl enable nomad
sudo systemctl start nomad
sudo systemctl status nomad
Before accessing the cluster via the UI or CLI, we should generate the ACL token with the following command on one of the server nodes.
nomad acl bootstrap
# Accessor ID  = 82872a3a-eddd-62a3-75cd-4160f2514a37
# Secret ID    = 857c7f04-2258-170a-7845-4140157d571e
# Name         = Bootstrap Token
# Type         = management
# Global       = true
# Create Time  = 2025-07-14 16:58:52.415281866 +0000 UTC
# Expiry Time  = <none>
# Create Index = 8
# Modify Index = 8
# Policies     = n/a
# Roles        = n/a
⚠️ Note: You cannot run this command more than once so save the Accessor ID and Secret ID somewhere safe.
Accessing Nomad UI
Now that we have configured the Nomad servers and clients, we can access the web UI. The webpage can be accessed via any one of the server ips on port 4646. ie. http://10.255.3.2:4646/ui. Sign in will be via the token generated in the earlier section.
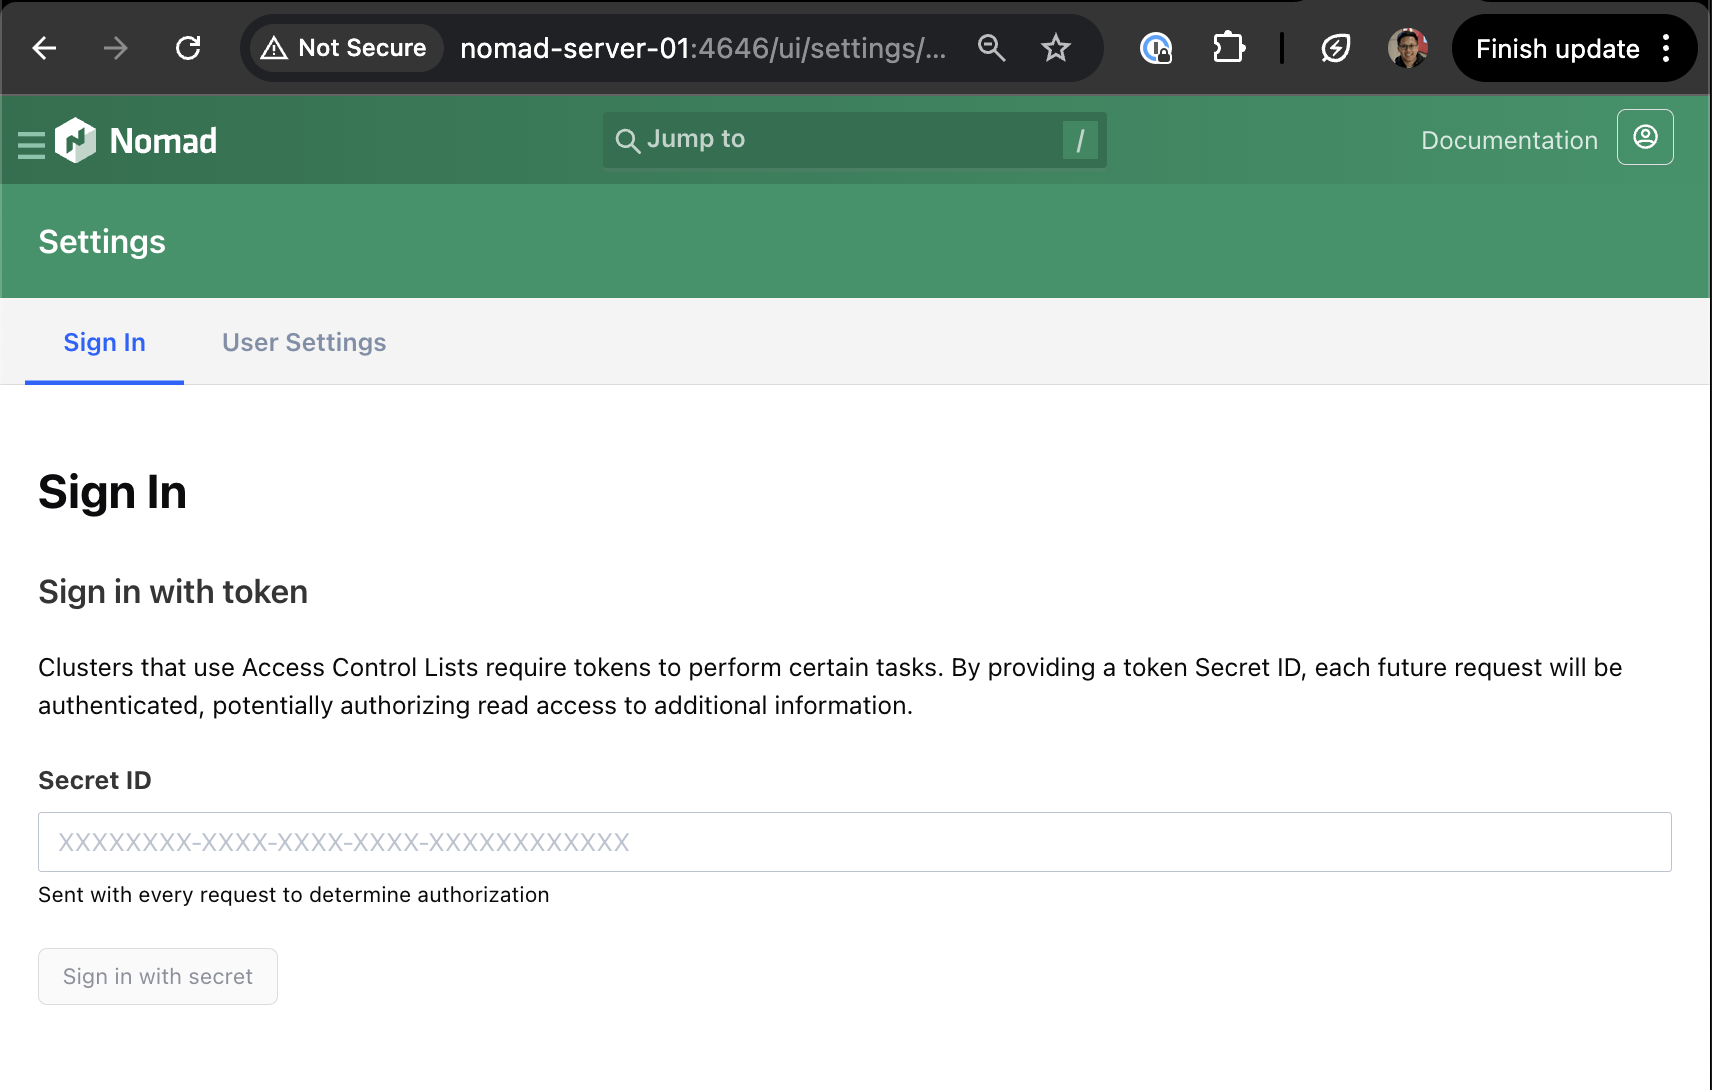 Fig 5. Nomad Web UI Sign In Page
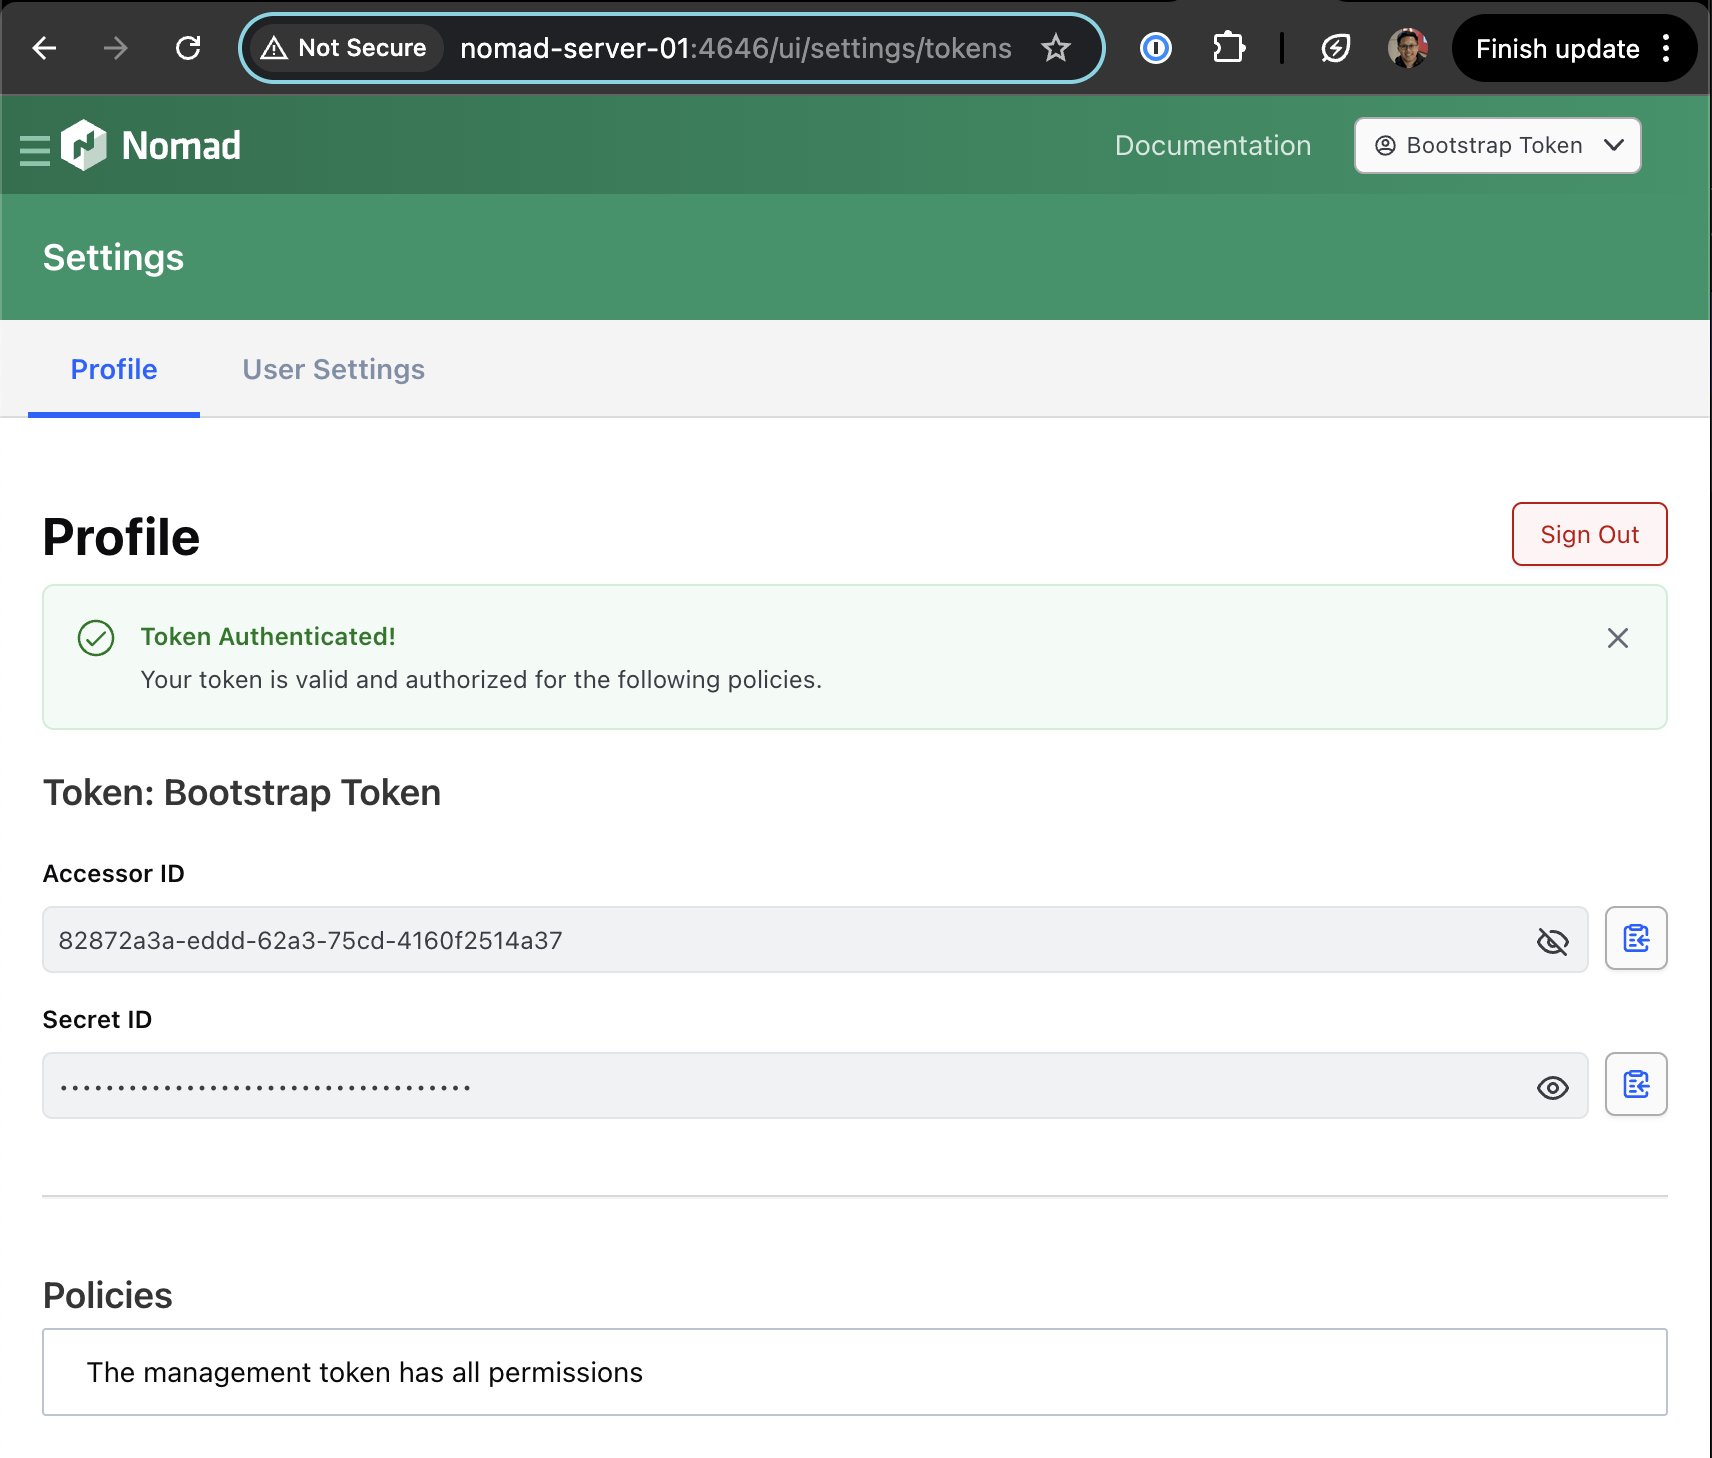 Fig 6. Nomad authentication with generated ACL token
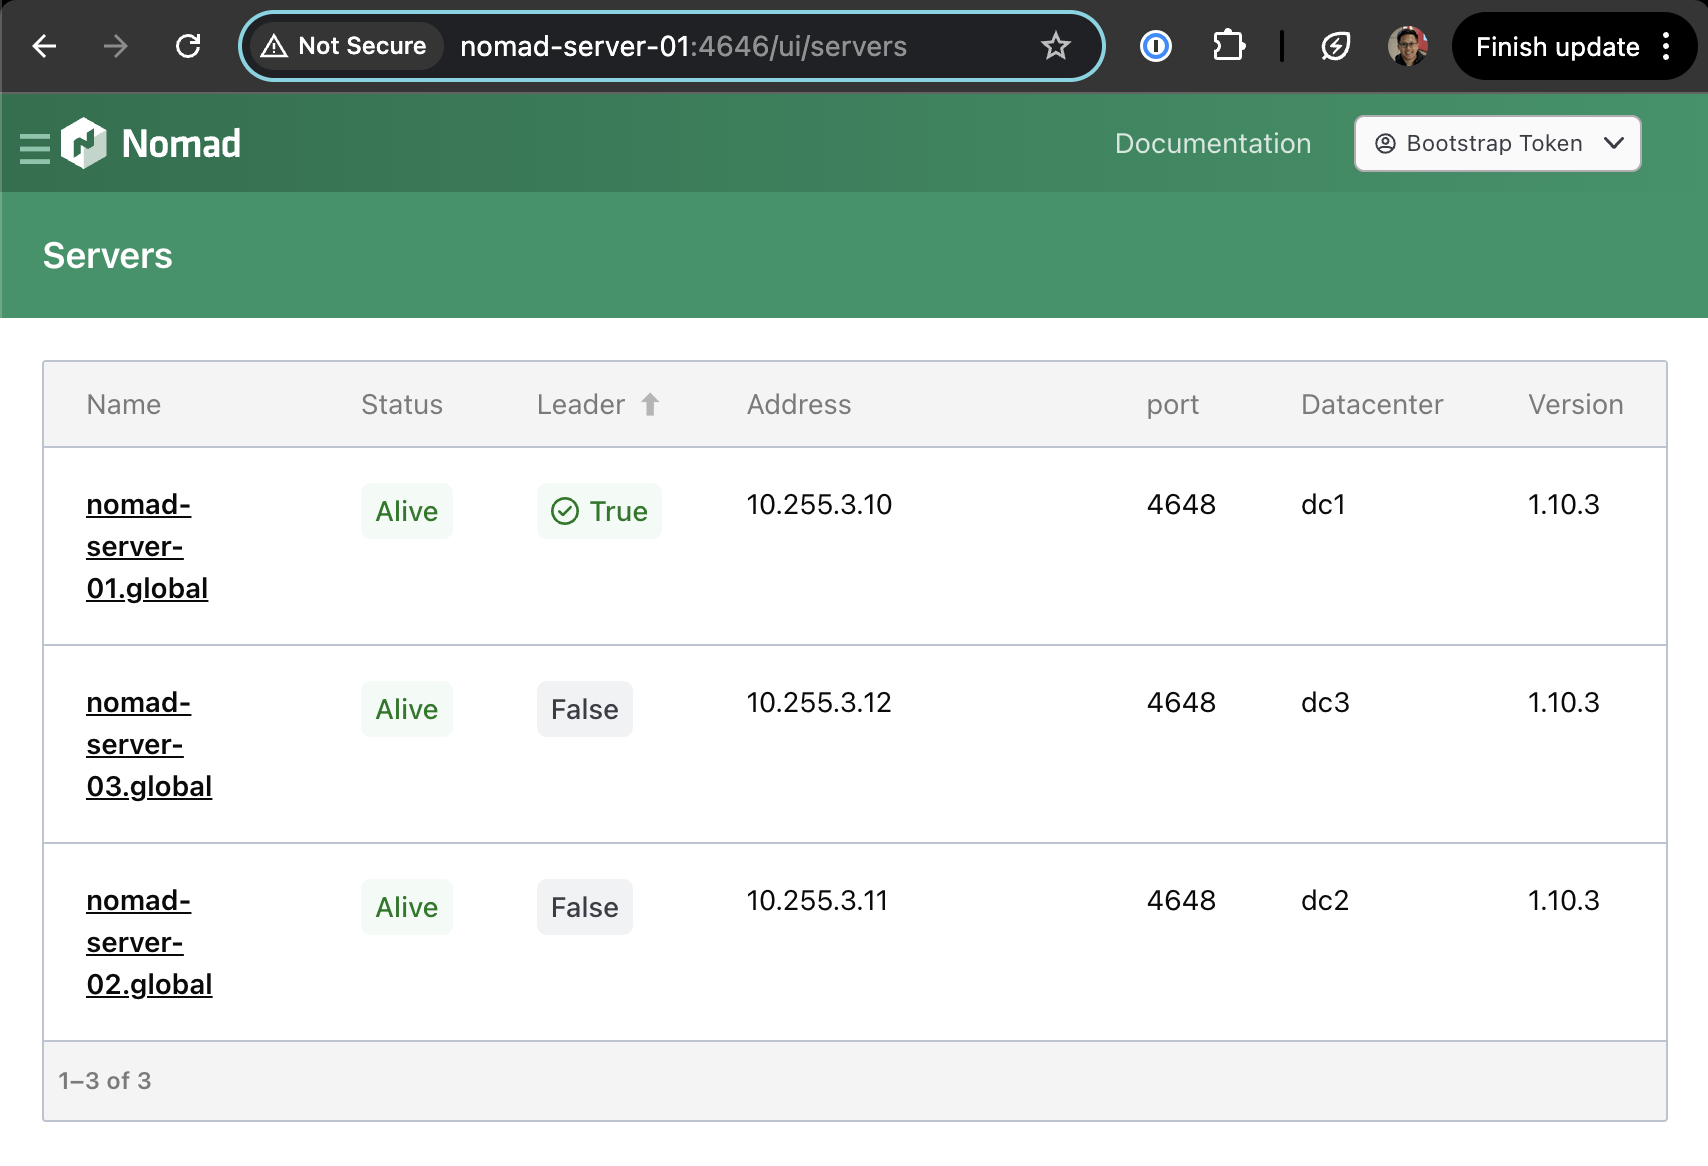 Fig 7. Nomad web UI servers page
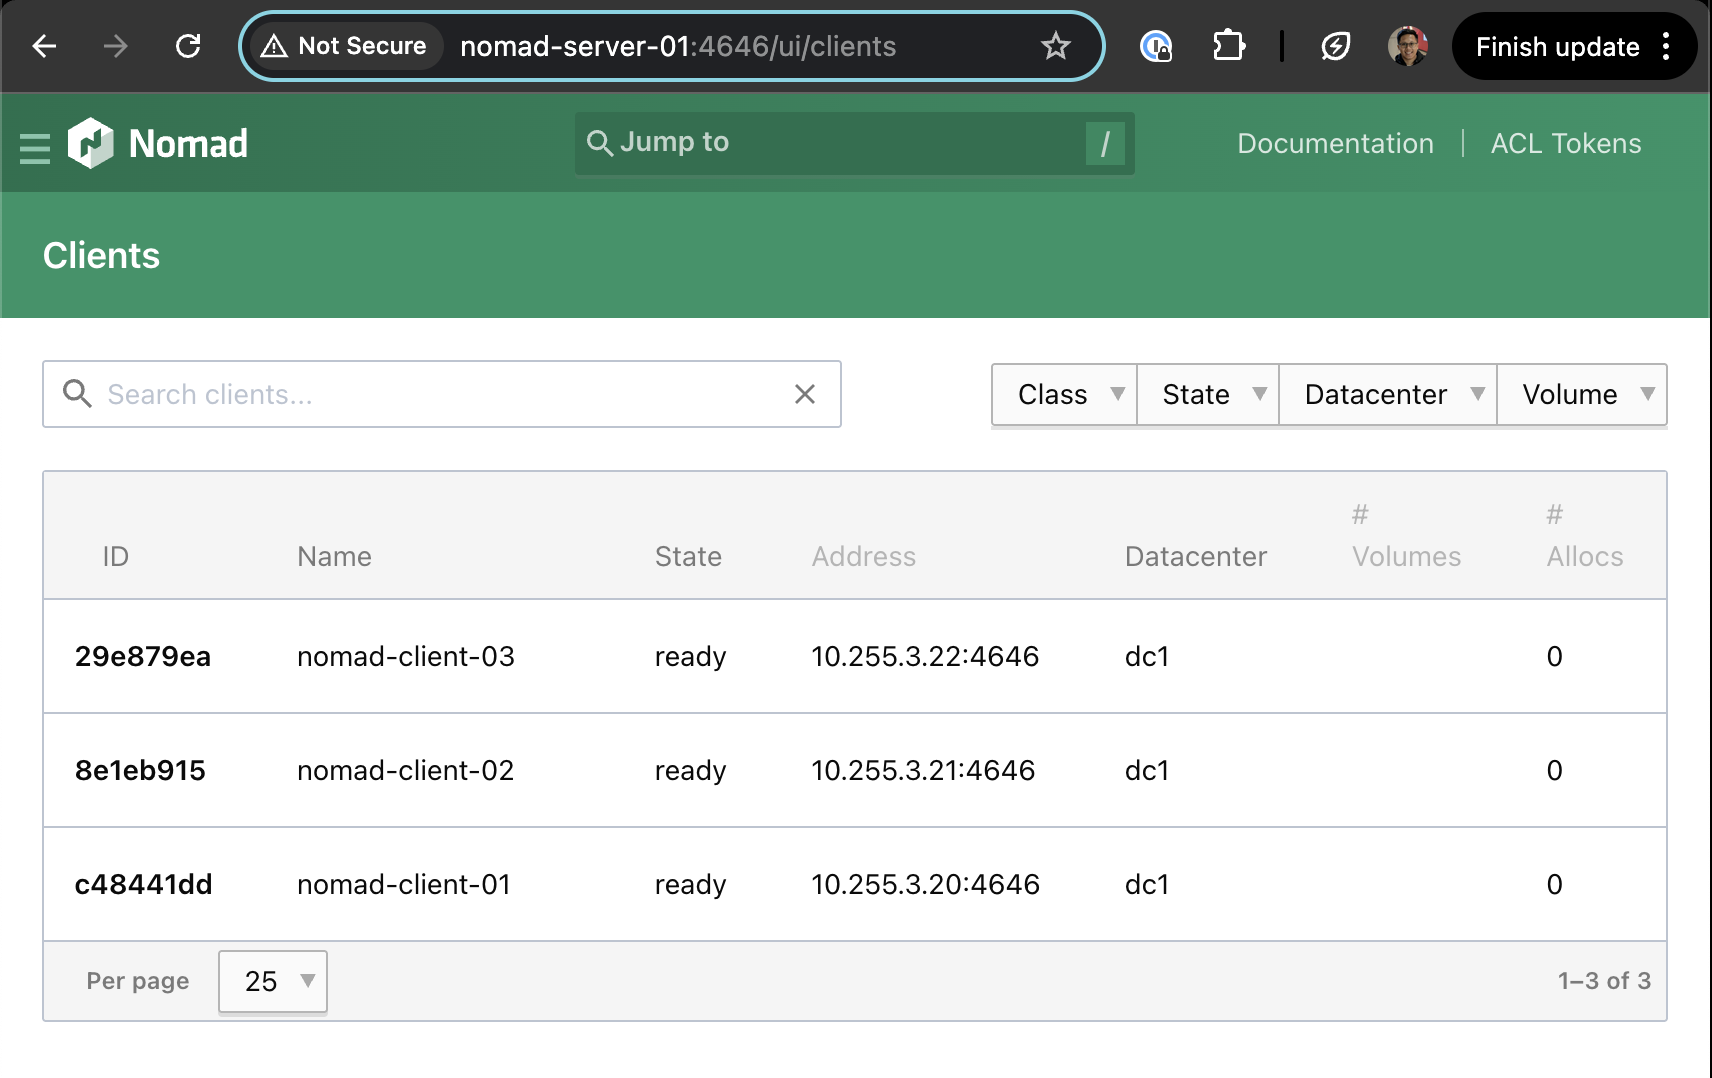 Fig 8. Nomad web UI clients page
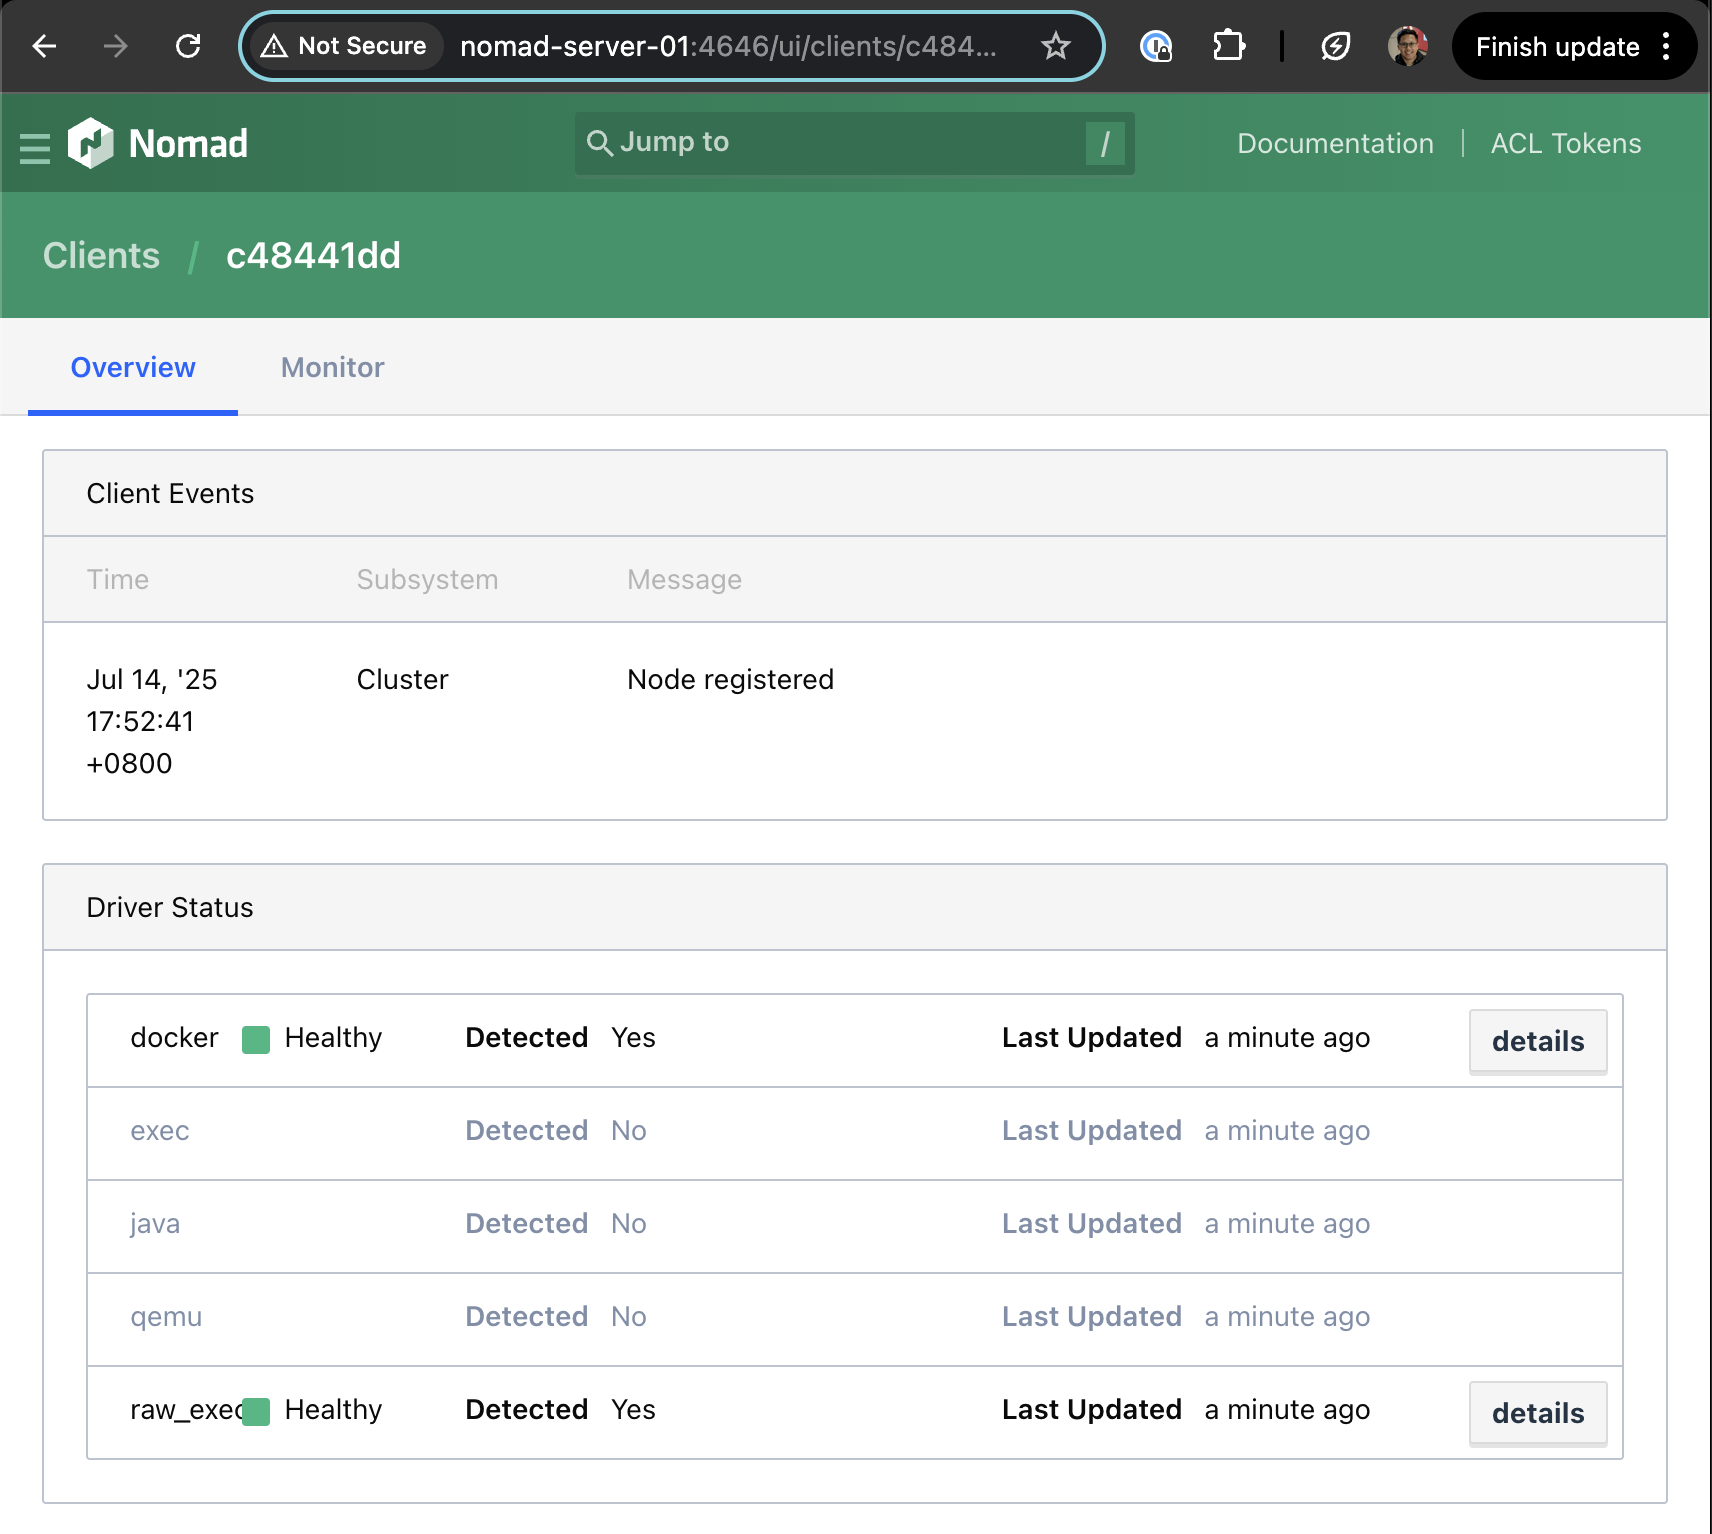 Fig 9. Nomad web UI clients overview
 Fig 10. Nomad web UI topology page
Deploying the First Job
To test deploying a job to the Nomad cluster that was created, we will be using the example application from here.
export NOMAD_ADDR=http://10.255.3.3:4646
export NOMAD_TOKEN=xxxxx

nomad server members
# Name                    Address      Port  Status  Leader  Raft Version  Build   Datacenter  Region
# nomad-server-01.global  10.255.3.10  4648  alive   false   3             1.10.3  dc1         global
# nomad-server-02.global  10.255.3.11  4648  alive   false   3             1.10.3  dc2         global
# nomad-server-03.global  10.255.3.12  4648  alive   true    3             1.10.3  dc3         global

# ==> View and manage Nomad servers in the Web UI: http://nomad-server-01:4646/ui/servers

nomad node status
# ID        Node Pool  DC   Name             Class   Drain  Eligibility  Status
# 04c99728  default    dc3  nomad-client-03  <none>  false  eligible     ready
# 32bcdcd6  default    dc2  nomad-client-02  <none>  false  eligible     ready
# e045a361  default    dc1  nomad-client-01  <none>  false  eligible     ready

# ==> View and manage Nomad clients in the Web UI: http://nomad-server-01:4646/ui/clients
git clone https://github.com/hashicorp-education/learn-nomad-getting-started.git
cd learn-nomad-getting-started/jobs
nomad job run pytechco-redis.nomad.hcl

# ==> View this job in the Web UI: http://nomad-server-01:4646/ui/jobs/pytechco-redis@default

# ==> 2025-07-25T21:40:09+08:00: Monitoring evaluation "86a912f0"
#     2025-07-25T21:40:09+08:00: Evaluation triggered by job "pytechco-redis"
#     2025-07-25T21:40:09+08:00: Evaluation within deployment: "b29e434f"
#     2025-07-25T21:40:09+08:00: Allocation "0ac24ce9" created: node "e045a361", group "ptc-redis"
#     2025-07-25T21:40:09+08:00: Evaluation status changed: "pending" -> "complete"
# ==> 2025-07-25T21:40:09+08:00: Evaluation "86a912f0" finished with status "complete"
# ==> 2025-07-25T21:40:09+08:00: Monitoring deployment "b29e434f"
#   ✓ Deployment "b29e434f" successful

#     2025-07-25T21:40:29+08:00
#     ID          = b29e434f
#     Job ID      = pytechco-redis
#     Job Version = 0
#     Status      = successful
#     Description = Deployment completed successfully

#     Deployed
#     Task Group  Desired  Placed  Healthy  Unhealthy  Progress Deadline
#     ptc-redis   1        1       1        0          2025-07-25T13:50:27Z

nomad job run pytechco-web.nomad.hcl
# ==> View this job in the Web UI: http://nomad-server-01:4646/ui/jobs/pytechco-web@default

# ==> 2025-07-25T21:41:23+08:00: Monitoring evaluation "feb66873"
#     2025-07-25T21:41:23+08:00: Evaluation triggered by job "pytechco-web"
#     2025-07-25T21:41:23+08:00: Evaluation within deployment: "48cc4bc1"
#     2025-07-25T21:41:23+08:00: Allocation "ca5ebec9" created: node "e045a361", group "ptc-web"
#     2025-07-25T21:41:23+08:00: Evaluation status changed: "pending" -> "complete"
# ==> 2025-07-25T21:41:23+08:00: Evaluation "feb66873" finished with status "complete"
# ==> 2025-07-25T21:41:23+08:00: Monitoring deployment "48cc4bc1"
#   ✓ Deployment "48cc4bc1" successful

#     2025-07-25T21:41:40+08:00
#     ID          = 48cc4bc1
#     Job ID      = pytechco-web
#     Job Version = 0
#     Status      = successful
#     Description = Deployment completed successfully

#     Deployed
#     Task Group  Desired  Placed  Healthy  Unhealthy  Progress Deadline
#     ptc-web     1        1       1        0          2025-07-25T13:51:38Z
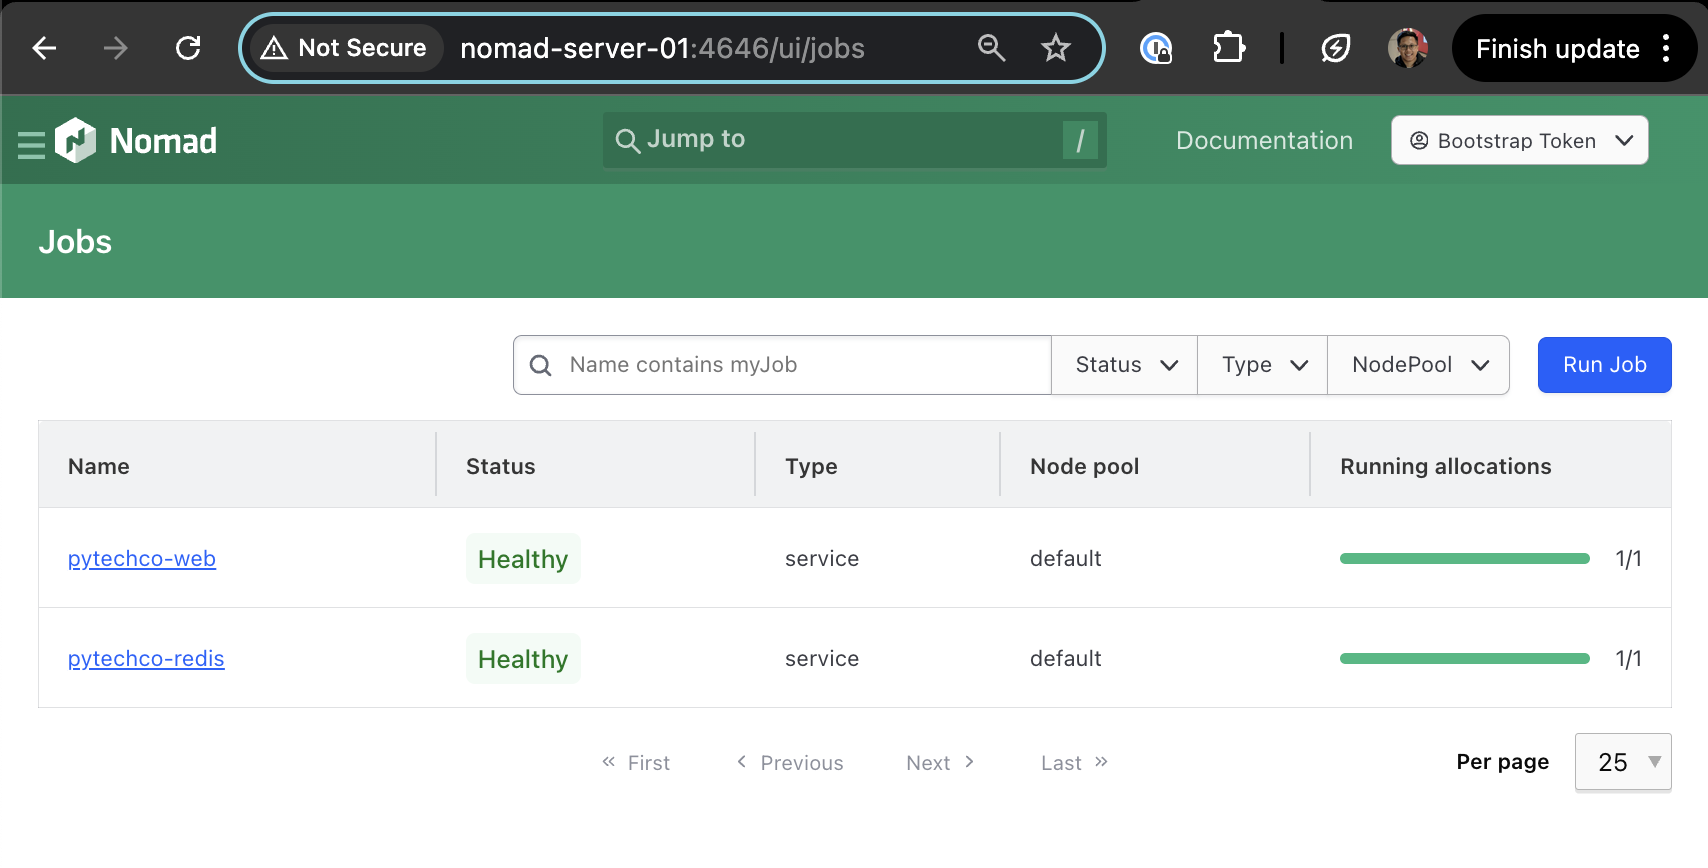 Fig 11. Deployed jobs
To view the endpoint for the web services, go to jobs > pytechco-web > Services > ptc-web-svc. You will find the IP address and port to access.
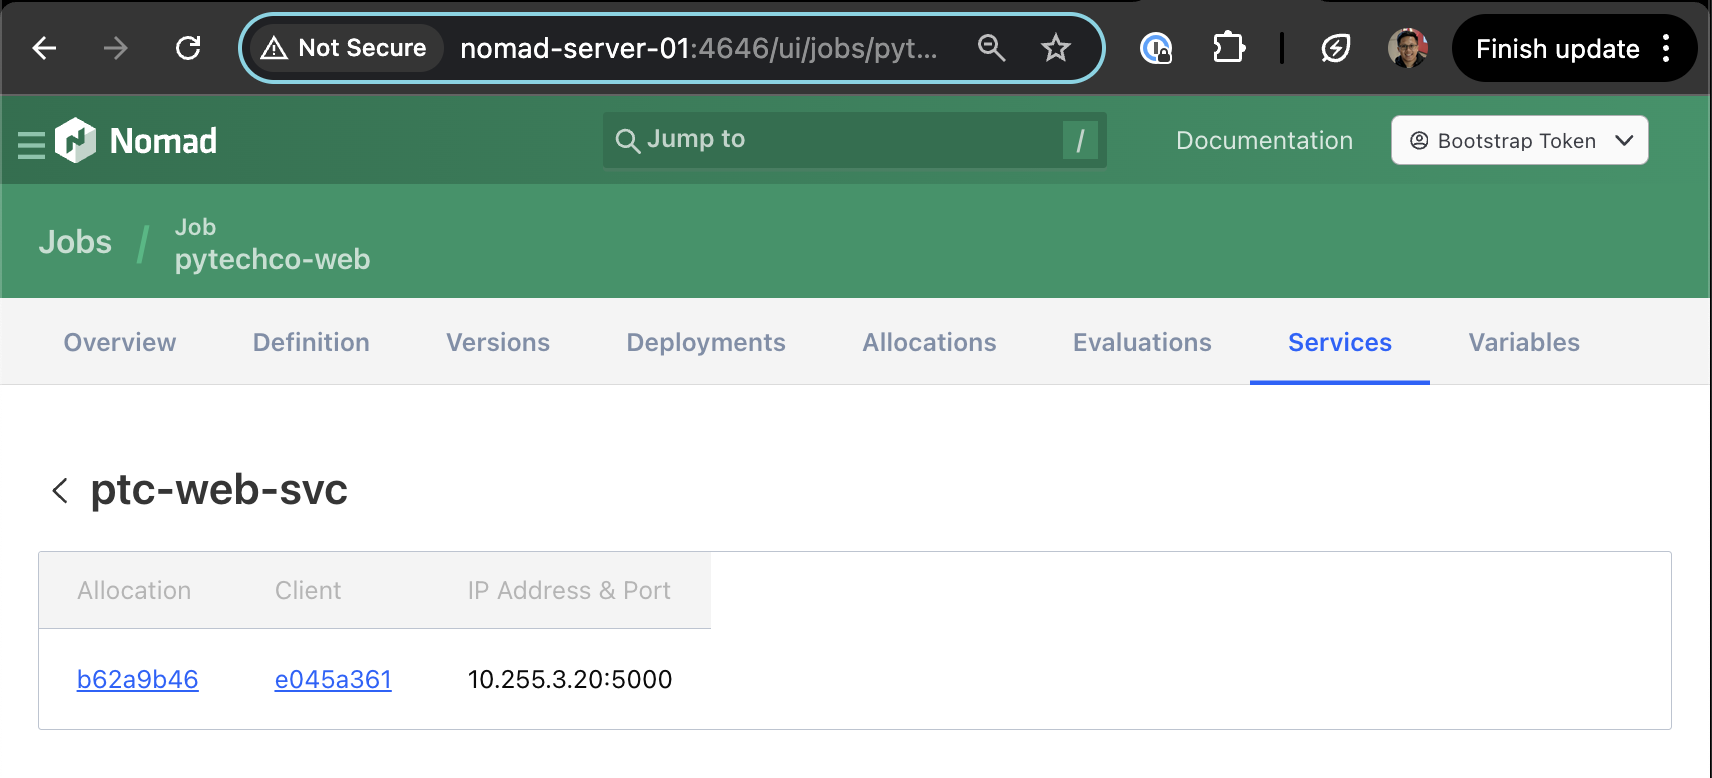 Fig 12. Nomad job services page for pytechco-web
Verification & Testing
Access the web service deployed on the Nomad cluster using the IP address and port allocated. Here it is showing that the DB has not been seeded yet.
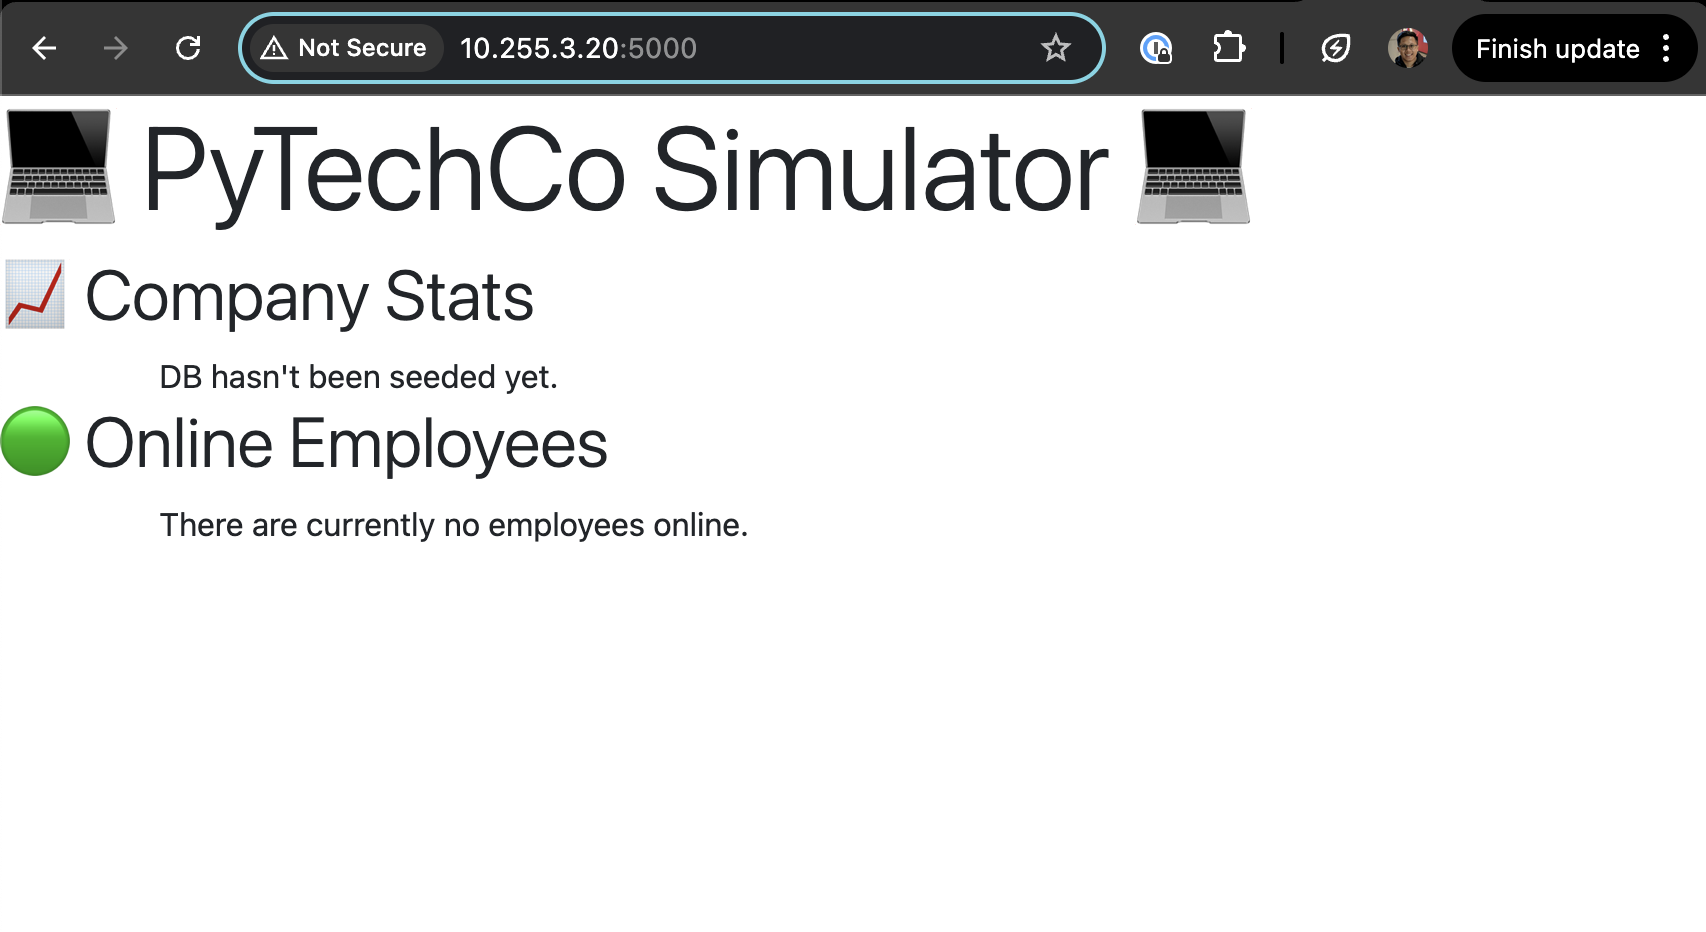 Fig 13. pytechco-web site
We will seed some data to the redis cache by running the following commands:
# setup job
nomad job run pytechco-setup.nomad.hcl
# Job registration successful

# ==> View this job in the Web UI: http://nomad-server-01:4646/ui/jobs/pytechco-setup@default

# dispatch the setup job with a budget of 200
nomad job dispatch -meta budget="200" pytechco-setup
# Dispatched Job ID = pytechco-setup/dispatch-1753451083-ccf5994b
# Evaluation ID     = f9c8a897


# ==> View this job in the Web UI: http://nomad-server-01:4646/ui/jobs/pytechco-setup%2Fdispatch-1753451083-ccf5994b@default

# ==> 2025-07-25T21:44:43+08:00: Monitoring evaluation "f9c8a897"
#     2025-07-25T21:44:44+08:00: Evaluation triggered by job "pytechco-setup/dispatch-1753451083-ccf5994b"
#     2025-07-25T21:44:44+08:00: Allocation "0d998c35" created: node "e045a361", group "ptc-setup"
#     2025-07-25T21:44:44+08:00: Evaluation status changed: "pending" -> "complete"
# ==> 2025-07-25T21:44:44+08:00: Evaluation "f9c8a897" finished with status "complete"

# submit the employee job
nomad job run pytechco-employee.nomad.hcl
# Job Warnings:
# 1 warning:

# * cron is deprecated and may be removed in a future release. Use crons instead

# Job registration successful
# Approximate next launch time: 2025-07-26T03:43:54Z (2s from now)
By now there are a few jobs running in the Nomad cluster: - pytechco-web (service type scheduler) - pytechco-redis (service type scheduler) - pytechco-setup (batch type scheduler - completed) - pytechco-employee (batch type scheduler - triggered by cron)
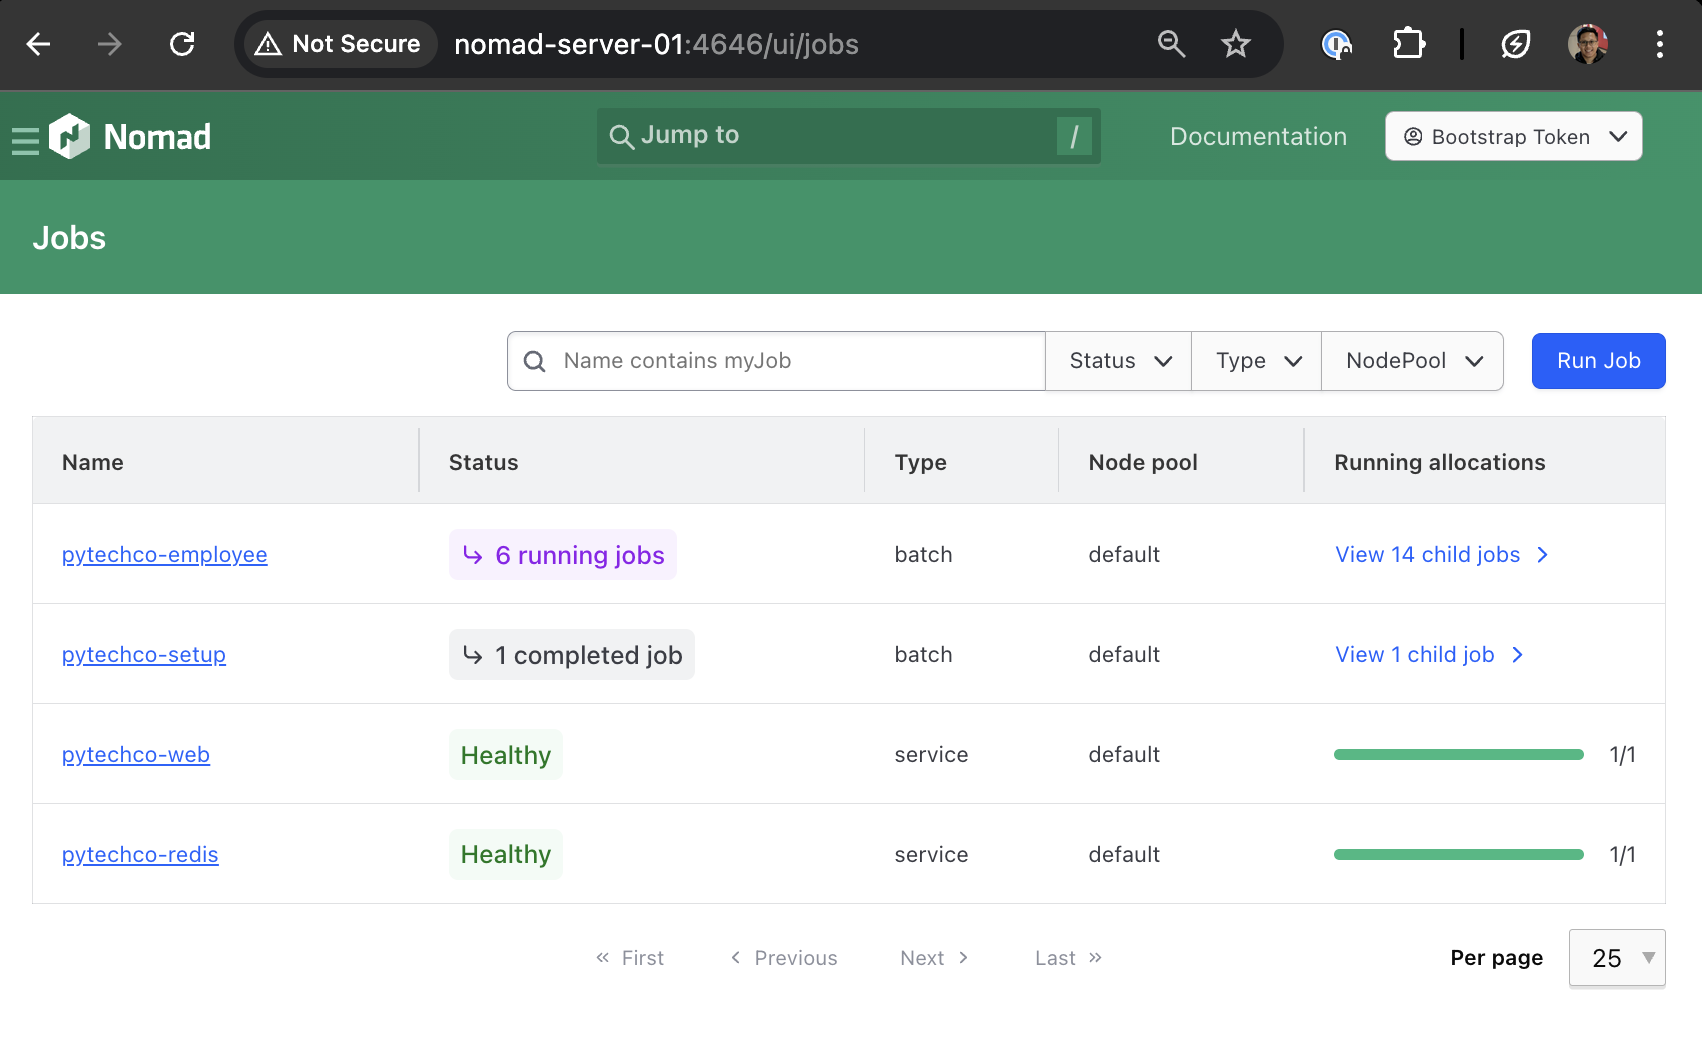 Fig 14. Nomad jobs page with updated jobs
The jobs are automatically scheduled on the servers depending on the constraints and requirements. In this case, there are no constraints set in the job definition when it was deployed to the cluster.
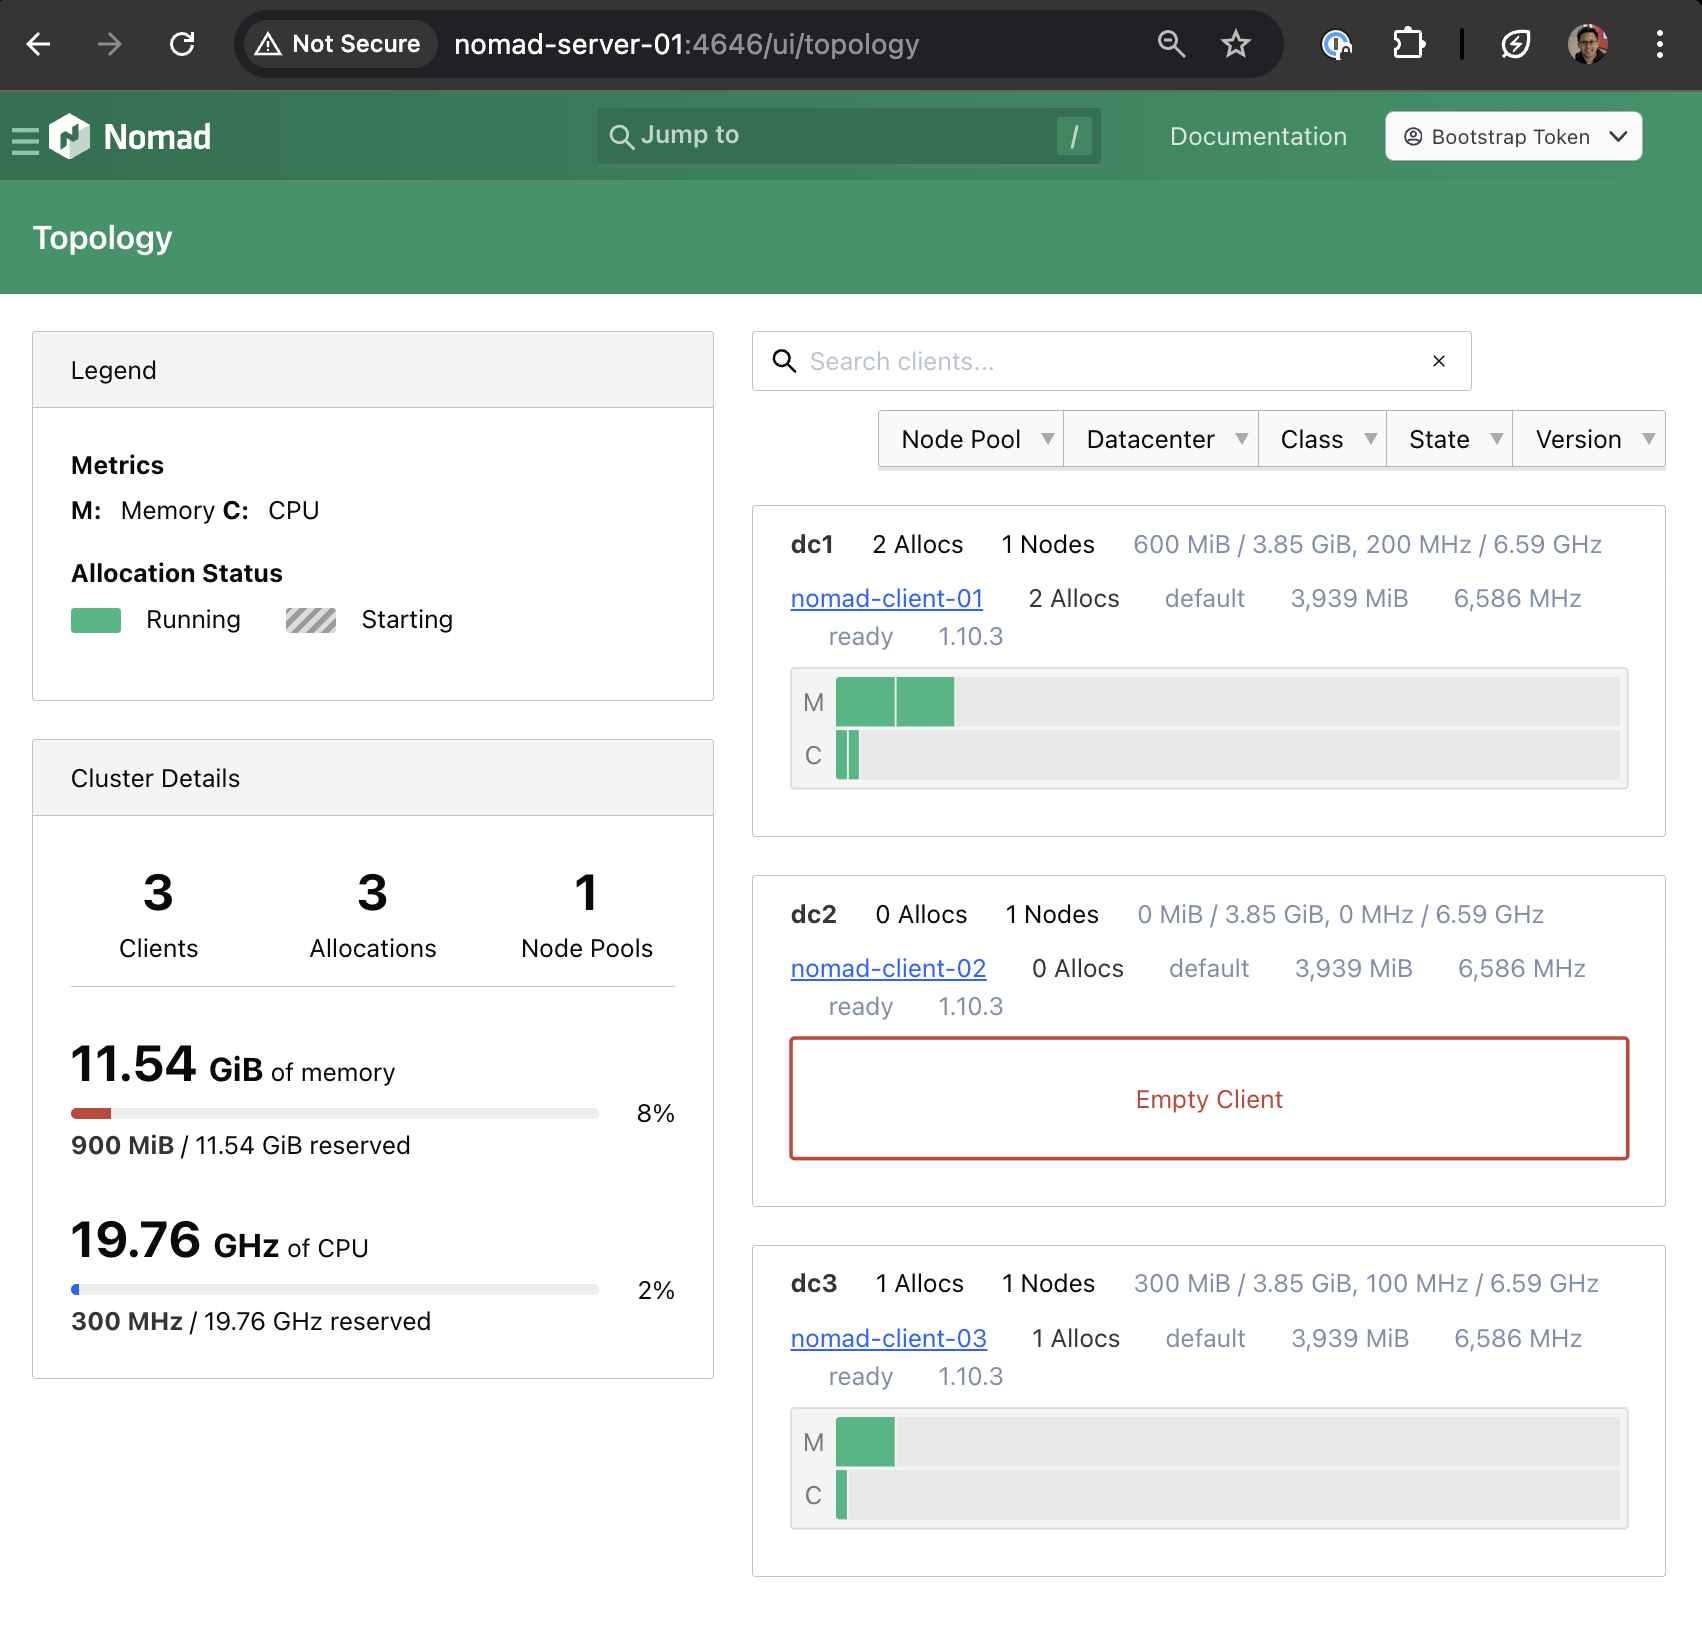 Fig 15. Nomad topology page showing jobs allocation
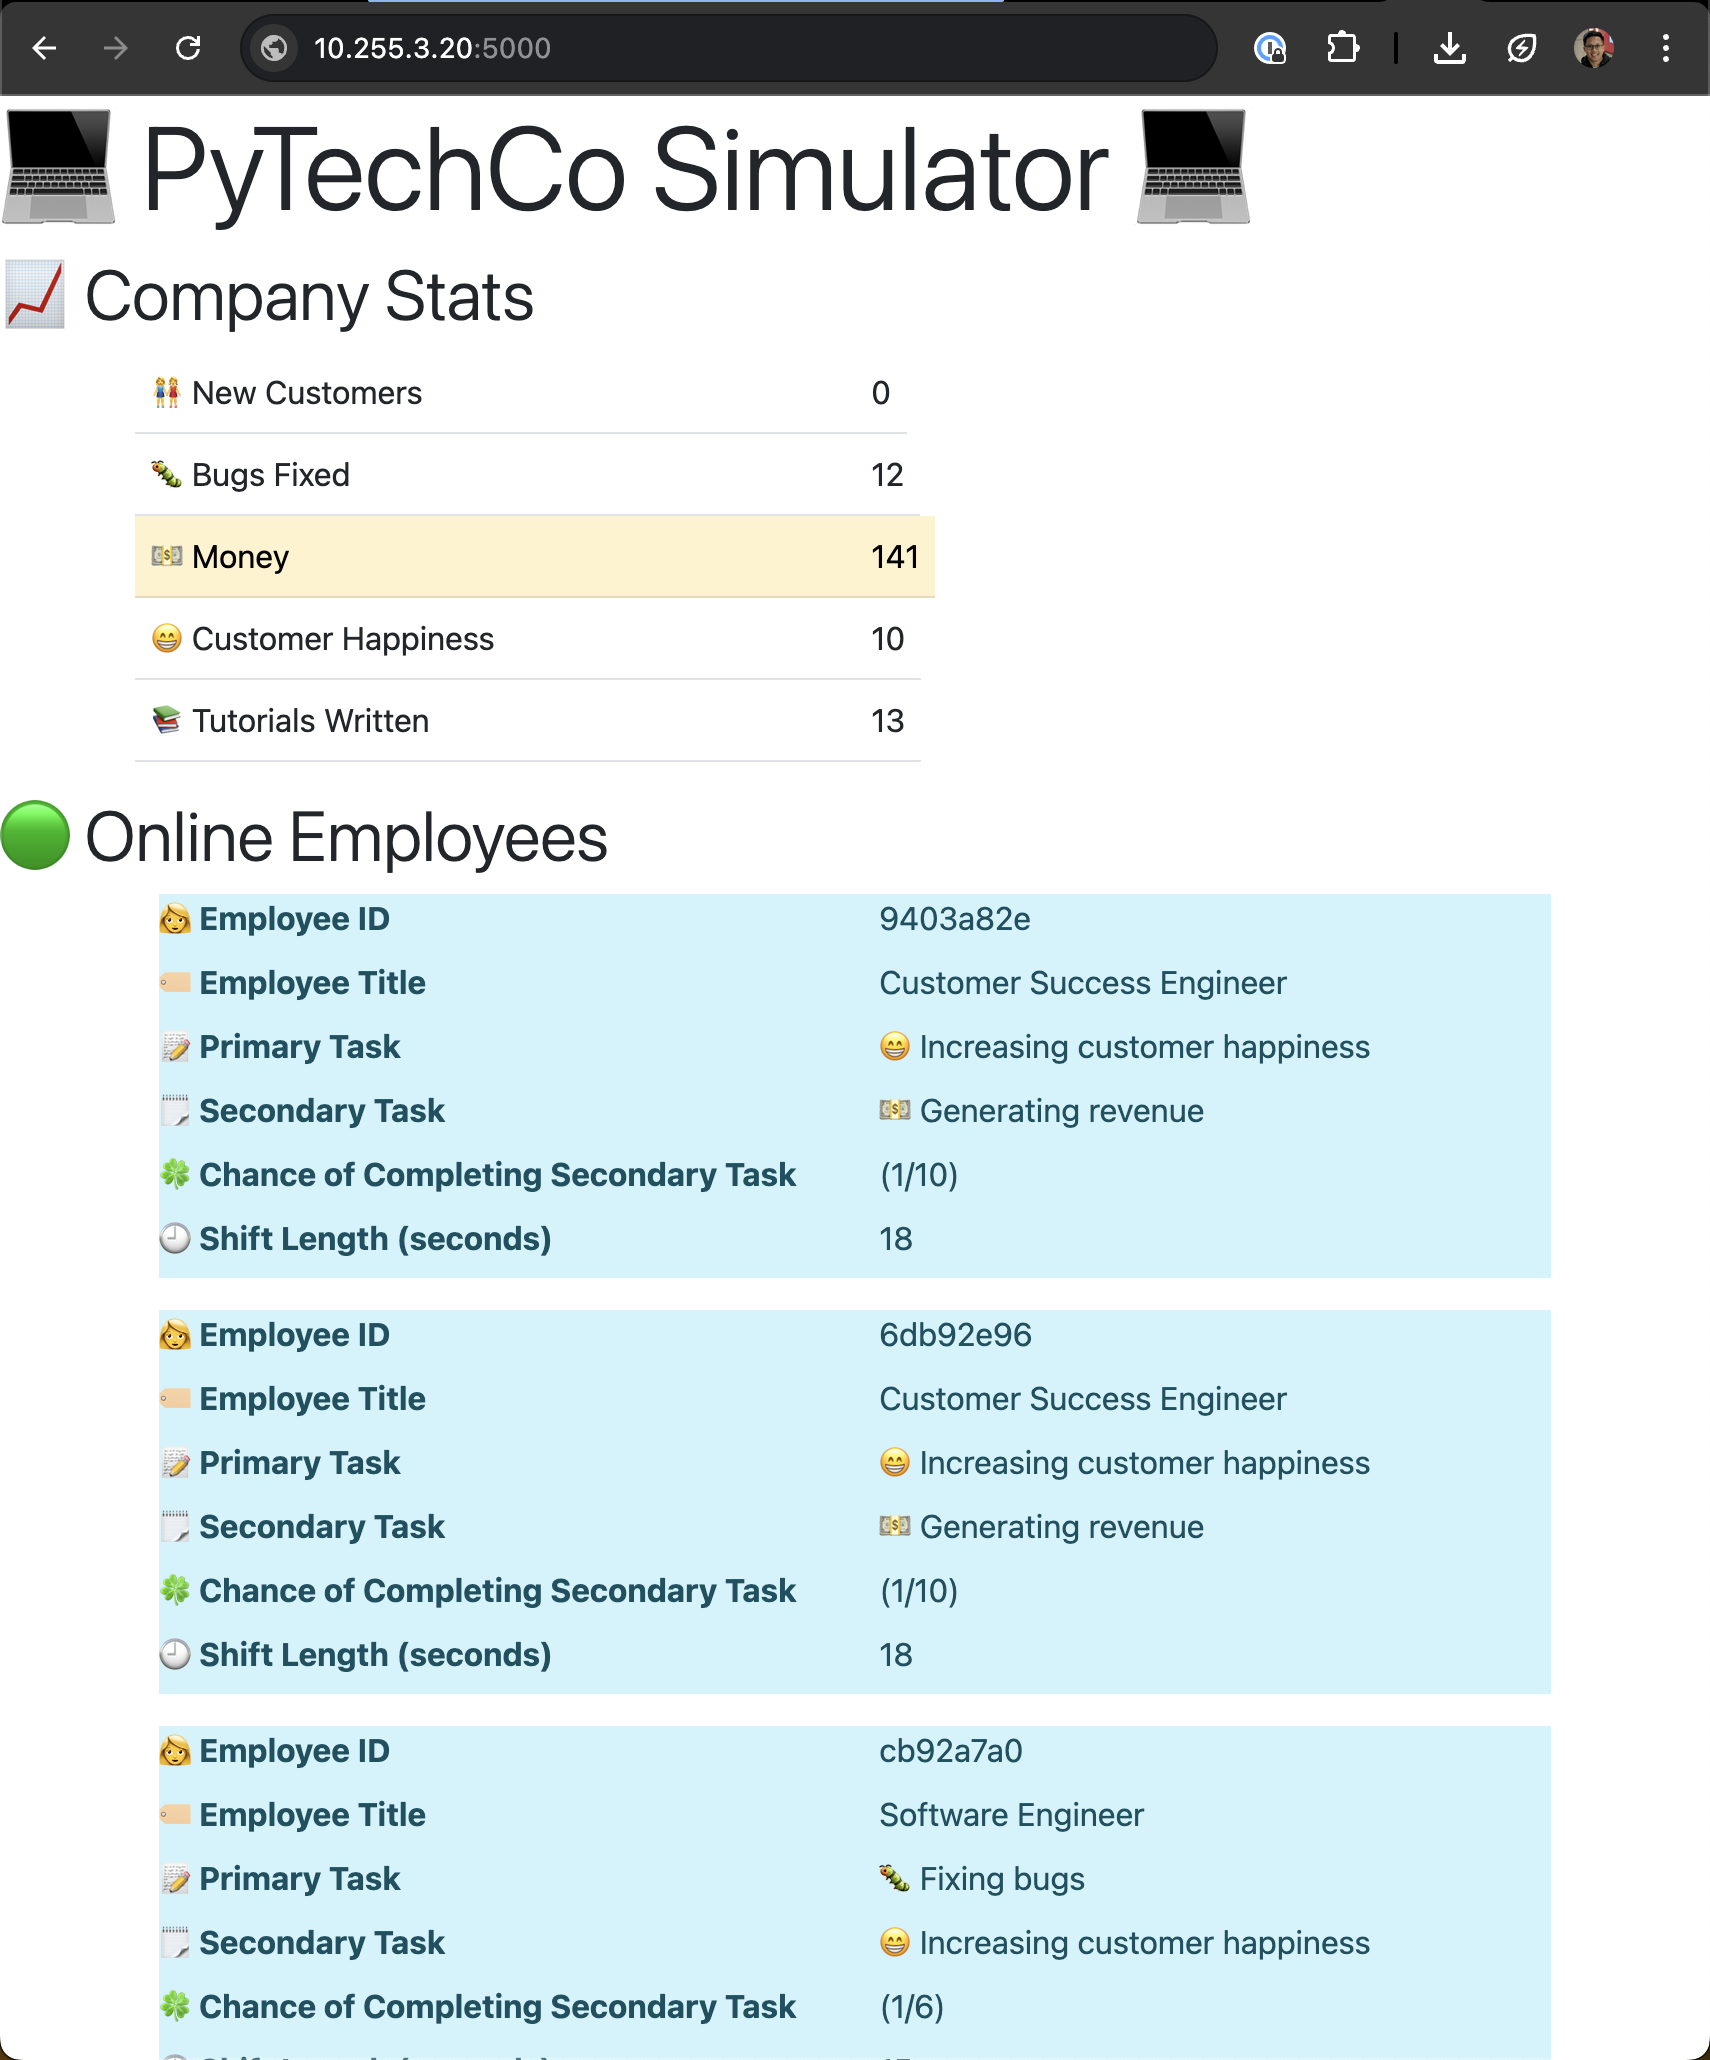 Fig 16. pytechco-web site with updated data
At this point, we have successfully deployed the following jobs on the Nomad cluster:
| Job Name | Type | Status | Purpose |
|---|---|---|---|
| pytechco-redis | Service | Running | Redis cache backend |
| pytechco-web | Service | Running | Web application frontend |
| pytechco-setup | Batch | Completed | One-time data seeding |
| pytechco-employee | Batch (Cron) | Scheduled | Periodic employee data updates |
This demonstrates Nomad's capability to orchestrate different types of workloads: - Persistent services (Redis, Web app) that run continuously - One-time tasks (Setup job) that complete and exit - Scheduled jobs (Employee job) that run on a cron schedule
Conclusion
In this post, we have successfully: - Set up a 3-node Nomad cluster on Proxmox - Configured both server and client nodes with ACL security - Demonstrated Nomad's versatility by deploying and orchestrating multiple application types: - Long-running services (Redis cache, web application) - One-time batch jobs (data seeding) - Scheduled cron jobs (periodic updates) - Explored the Nomad UI for cluster management.
We've seen how Nomad simplifies container orchestration while providing the flexibility to handle diverse workloads beyond just containers. The cluster we've built demonstrates Nomad's core strengths: simplicity, reliability, and operational ease.
What's Next?
The next steps involve integrating Consul for service discovery and Vault for secrets management. This creates a complete HashiCorp stack that is production ready.